Sealing asphalt and concrete driveways renews their look and helps combat corrosion and freeze damage. It can be an inexpensive DIY project that extends its usable life, saving you thousands in driveway replacement costs. In warmer climates that don’t see frost, it’s not always necessary to do much more than seal cracks and fill pits and holes.
Sealing your driveway isn’t always necessary, but under the right circumstances, driveway sealant benefits outweigh the costs. A professional does the job right with the best product. The work and material quality are especially important in cold climates, where freezing temperatures and road salts can destroy your driveway. This guide will walk you through the steps necessary to rejuvenate your drive.
On This Page:
- Choosing the Best Sealer
- Asphalt Driveways – Coat Tar vs. Asphalt Sealcoats
- Concrete Epoxy, Silicate, & Acrylic
- Common Brands
- Tools/Materials Needed
- Sealing/Coating Process
- When’s the Best Time to Apply Sealant?
- Cleaning & Preparation
- Repairing or Patching Cracks & Holes
- Coating
- Sealing
- Adding a Second Coat
- FAQs
- DIY vs. Working with a Pro
Project Specifics:
- How Long Does this Project Take? –
- 2 – 3 hours working time
- 4 – 48 hours drying time for asphalt
- 3 – 24 hours drying time for concrete.
- Cost of Project as DIY – Varies depending on sealant type. $100 to $400 depending on the type of sealant. Anywhere from $0.10 to $0.25+ per square foot.
- Cost of Project Completed by a Pro :
- For epoxy on concrete – $2,000 for 750 square feet or $2.50 to $3.00 per square foot
- For asphalt sealcoats – $450 for 750 square foot or $0.50 to $0.75 per square foot
- Refer to our article on Driveway Sealing Costs for more.
- How Long Will the Seal Last? – Most sealants come with a 10-year warranty, but the lifespan depends heavily on the climate.
- How Frequently Do You Need to Reseal?
- Concrete – up to once per year or as long as ten years.
- Asphalt – with UV protectant additives – 5 to 10 years.
- Difficulty of task – Easy
Choosing the Best Sealer
There are several types of sealants depending on your driveway type. Professionals can usually get sealants at inexpensive rates compared to retail outlets and may be able to find a higher quality sealant for less.
Asphalt – Coal Tar vs. Asphalt Sealcoats
Asphalt usually uses coal tar or an asphalt-based sealcoat, but some contractors will recommend a rubberized sealer alternative. Professionals often use brands that are not always readily available for consumers. Ask your contractor which they recommend.
- Coal Tar is created through bituminous coal distillation. It has been the asphalt sealing standard for many years, though it is quickly losing popularity. It’s banned in some places due to its smell and environmental and health concerns. It creates a hard-sealed surface that performs well. However, it is not ideal in extremely low temperatures.
- Asphalt Sealcoats are asphalt-based sealants usually with stabilizing and UV protecting additives. The idea is simple – what’s better to coat asphalt with than asphalt? These types have low odors and are the more strong>environmentally responsible choice.
- Rubberized – This type could be the better choice for colder climates because they have UV protectants and remain elastic in cold temperatures. Asphalt slowly breaks down in direct sunlight, so UV protectants are crucial for long-term durability.
Concrete – Epoxy vs. Silicate vs. Acrylic
Concrete sealers come in three main varieties: an epoxy, acrylic and silicate sealers. These sealers are either a penetrating or surface type sealer.
- Epoxy is extremely popular for poured concrete, though expensive to install. This surface sealer is extremely durable and creates a hardened barrier to protect the concrete from both abrasion and chemicals.
- Acrylic is another popular surface sealer. This common type is less durable than epoxy but is easier to apply and usually cheaper.
- Silicate sealers work differently. For use only with concrete, they are generally more liquid than gel and penetrate through the surface of your driveway. Concrete is partially composed of silicate hydrate. With a silicate sealer, you’re essentially reinforcing or “bulking up” the natural building blocks of your concrete drive. This creates denser concrete and helps fill hairline gaps and cracks.
Common Sealant Brands
- Latex-ite ($40 per 4.5-gallon pail) – offering a wide line of latex and rubberized acrylic fillers, sealers and patches for asphalt driveways.
- Quickrete ($110-$130 per 5-gallon pail) – acrylic concrete sealer from one of the top concrete brands.
- Seal-Krete ($65-$130 for 5-gallons) – offering a wide range of epoxy concrete sealers and cleaners.
- Henry ($40-$70 per 5-gallon pail) – offers rubberized acrylic asphalt fillers, resurfacers and sealers.
Ready to start your Driveway Sealing?
Find ProsReturn to Top
Tools & Materials Needed
If you’re doing this DIY, you’ll need these tools and materials. Make sure you purchase the right type of sealant, filler and patch to match the kind of driveway you have. If you hire a professional, they’ll supply all the tools and materials or use a sealant you’ve already bought.
- Sealant
- Squeegee or Brush
- Power Washer or Garden Hose with high-pressure nozzle
- Detergent such as Simple Green
- Paint Brush
- Asphalt or Concrete Patch
- Blacktop or Concrete Crack Filler
- Tamper
- Power Drill with paint mixing attachment or hand paint mixer
Sealing or Coating a Driveway
Coating is a fantastic way to protect your driveway. It’s a simple and straightforward project that can be finished in a weekend. No matter what type of surface you’re working with, you’ll need to prepare it by cleaning it thoroughly and repairing any cracks or holes.
Step 1: Determining the Best Time to Seal
Read all the directions on the product you bought before starting. This will help you plan for both weather and recoating times. Some sealants need 24 hours between coatsclear weather forecast for at least 48 hours. Some sealants will need misting on sweltering days. Always follow the manufacturer’s directions.
Step 2: Cleaning & Preparation
Surface preparation is key to a quality job. Even if it looks clean, it isn’t. Most contractors will include this as part of their fee, though you can save a bit of money by doing it yourself.
- Use a pressure washer or garden hose with a high-pressure nozzle and some detergent, like Simple Green. Clean the entire driveway from the highest point to the lowest. Stubborn oil and grease stains may need extra detergent or degreaser and scrubbing.
- Go over the entire driveway again with clean water to rinse the detergent off.
- Use a stiff brush or broom to sweep any leftover, loose bits from the driveway surface. Make sure there are no water puddles and allow to dry if necessary. For more details on driveway sealing and cleaning refer to these driveway sealing facts.
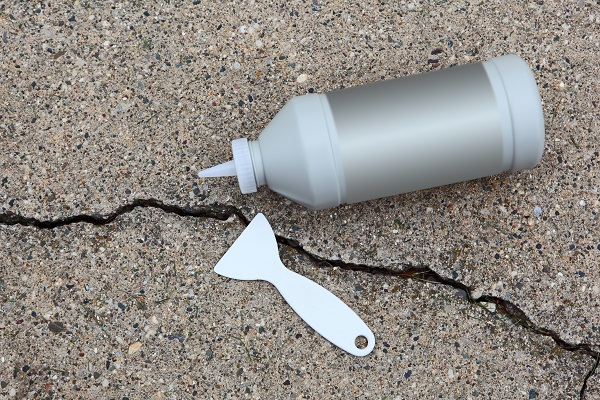
Step 3: Repairing & Patching Pavement Cracks
Apply sealants to a smooth surface. Patch all holes and cracks before applying the coating. If your surface is free of cracks and holes, skip this step.
For Cracks: Apply the appropriate type of crack filler for your surface. Invert the bottle and fill all cracks. If necessary, use a putty knife to flatten the sealant out—although many brands are self-leveling. Allow time for the crack filler to set.
For Holes: Clean all debris from the holes with a power washer or hose. Use a patching kit that matches your driveway type. These are usually available at local home improvement stores. Follow all directions on the kit because kit types and materials vary.
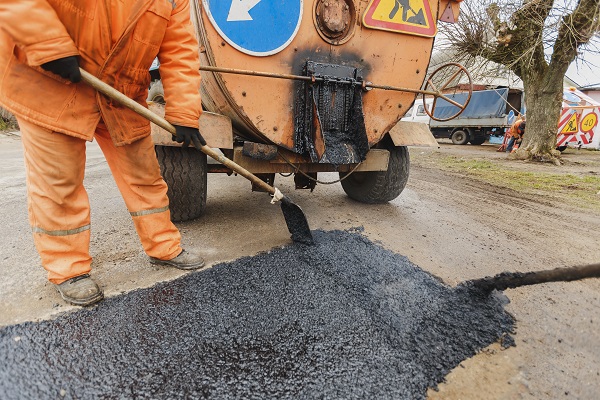
- For asphalt, use a patch kit. Prepare the asphalt patch per the manufacturer’s directions and pour into the hole. Use a tamper to tamp the spot down. Add more patch mix as needed until the hole is level with the surrounding area. Consider installing new asphalt if the driveway is beyond repair. Consult a professional for an asphalt repair or replacement quote.
- For concrete, use a patch kit. You will need a trowel to mix and apply the patching compound. Use the trowel to smooth the surface when done. You will need to wait for the compound to harden before applying any coatings. Plan ahead! Some concrete driveways need extensive repair – it may be easier to pour new concrete or resurface your drive. Resurface or repair your concrete driveway for about $1,500 before sealing if there is extensive weather damage. This is a project best left to a professional contractor.
Ready to start your Driveway Sealing?
Find ProsReturn to Top
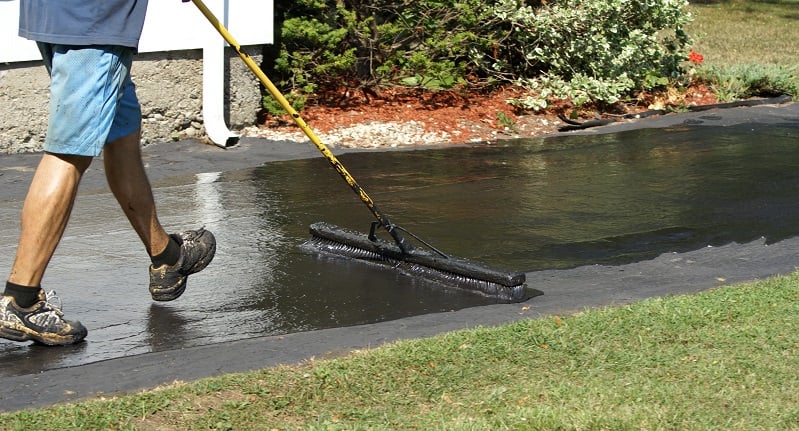
Step 4: Applying the Sealer to Blacktop or Concrete
- Mix the sealer. Follow the manufacturer’s recommended mixing guidelines. Mix for approximately five minutes. Use a power drill and mixing attachment to speed the process up.
Tip: invert your sealer buckets for 24 hours before sealing to help mix the solids. - Seal the edges. Apply sealant with a brush to the highest border and along the sides of the driveway.
- Pour a line and spread. Use gravity – start at the highest point and work your way downhill. Most asphalt sealers require a squeegee while most concrete sealers use a brush or sprayer. For most sealers, pour out a line of sealant along the highest edge of the driveway. Only work on 2 to 4-foot sections at a time. Use a squeegee (or brush if needed) to spread the sealant. Work from one edge and across the driveway spreading the sealer thinly. Pour enough out to always have a slight puddle ahead of your squeegee – this is a “wet edge” which avoids premature drying while you work.
Tip: If the sealant calls for two coats, apply the second perpendicular to the first. If you went across the driveway the first time, go up and down with the second layer. - Place empty buckets at the end of the driveway. You don’t want to drive on it for at least 24 hours, though we recommend 48 hours. Don’t walk on it either – you’ll track it into your home.
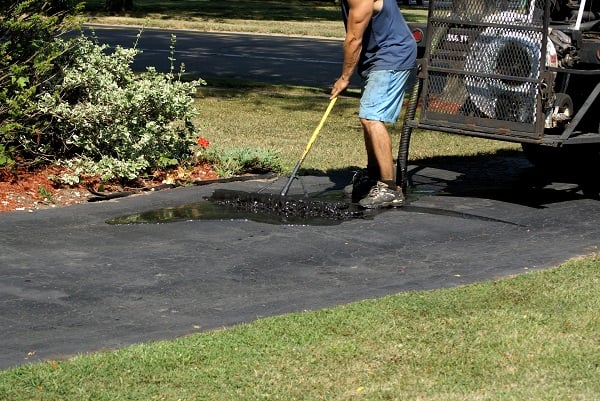
Step 5: Resealing the Edges
Steep areas, usually around the edge, may require more sealant since you’re working against gravity. You may want to apply an additional coat to these areas with a paint brush. Don’t use a squeegee. Wait until each coat is dry and set according to the directions before applying another coat.
Step 6: Adding a Second Coat of Tar/Sealer
Refer to your sealer instructions to find out if you need a second coat. It varies by product type. The instructions will also tell you how soon you can recoat; anywhere from 4 to 24 hours. Follow the above steps when applying the second coat.
Ready to start your Driveway Sealing?
Find ProsReturn to Top
FAQs
What is Driveway Sealing?
Sealing your driveway protects it from UV rays, water, and corrosive salts and chemicals. Sealants used in this process come in asphalt, acrylic, epoxy, coal tar, or silicate forms.
Should I Seal My Driveway?
In warm, dry climates where frost isn’t an issue, sealing a driveway is optional. However, the suns rays break down asphalt over time, so even in warm climates, it’s not a bad idea. In cold climates with freezing water and road salts an issue, sealants can extend the life of your drive. There’s always the option of installing a heated driveway. While you can still seal a heated driveway, the heat removes the need to use corrosive salts. It also protects it from cracking from water penetrating and freezing.
What’s the Difference Between Asphalt & Concrete Coating?
Asphalt coatings are a coating that protects it from the sun and weather. Concrete absorbs sealants into the porous surface which then binds to small concrete particles. Always use the proper sealant for your driveway material.
What’s the Best Sealing Temperature?
Usually between 60 and 80 degrees Fahrenheit. Refer to the sealant manufacturer’s instructions for the best temperature.
How Long Does Sealer Take to Dry?
It depends on the type. Some are as fast as 4 hours, others take up to 48 hours to fully cure.
How Many Coats Do I Need to Apply?
One or two depending on the manufacturer’s recommendations.
Does it Waterproof My Driveway?
They almost always do. Some concrete sealers create a hydrophobic (water repellent) barrier and only claim to be “water resistant” on the label.
Ready to start your Driveway Sealing?
Find ProsReturn to Top
DIY vs. Hiring a Pro
This is a straightforward job for most DIYers. So long as you prepare the surface correctly and thoroughly (don’t skip washing and repairing), you’ll end up with a professional-looking result for around $100 to $400. Hiring a professional to seal your asphalt drive costs a bit more at $200 to $500. But if you’re planning to lay epoxy on concrete, a professional may charge $2,000 or more.
Improperly fixed cracks or holes, or a poorly cleaned surface, may cause the sealant to fail to adhere. Hiring a professional to complete this project is a relatively inexpensive way to extend the life of your drive. With a new driveway costing an average of $4,000, it may be worth the expense.
 Concrete Resurfacing – Process & Options
  Pouring a Concrete Driveway or Walkway
  Spruce Up with Decorative Concrete Resurfacing
  Best Driveway Materials
  Simple Home Repair and Maintenance Tips for Everyone

Are You Familiar With This Topic? Share Your Experience.