On This Page:
- Key Considerations
- How to Build a Pergola
- Questions to Ask Your Contractor
- Pergola Add-ons
- Maintenance & Repairs
- Conclusion
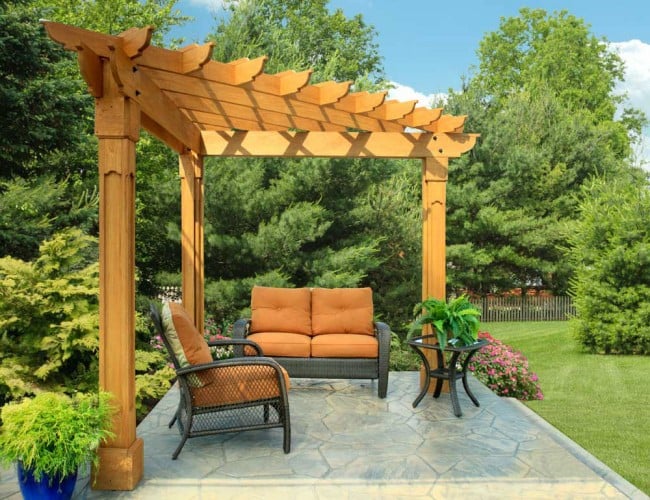
A pergola is an open framework gazebo. They were very popular in Italian Renaissance gardens until the 18th century. However, they experienced a resurgence in the late 20th century and have remained popular ever since.
A pergola won’t protect you from the elements, but it combines indoor and outdoor space and makes a great focal point. Many people train woody climbing plants to provide shade and a pop of color.
Pergolas can be installed by a professional or they can be built DIY. They require a bit of knowledge and a lot of measurements and placement considerations, so most people tend to hire a contractor.
- Time Needed – Depending on if you buy a kit or build your own, a pergola can be built in under a weekend or just a few days.
- Cost – A kit costs from $500.00 to $4,000.00 depending on the material and features. An experienced DIYer can build one from scratch for around $300.00.
Key Considerations
Check your local codes to see if permits are required before building. If you plan to add electrical features, you’ll definitely need permits. There are other considerations as well:
- Cost: An average 10×12 kit costs around $1,000.00. Hiring a professional can double this cost.
- Complexity: An elaborate design will cost more and take longer than a basic design. Plan your budget and time accordingly.
- Experience with tools: Power tools can lead to serious injury or death if not used properly. Be sure you know how to use them and wear safety gear.
- Attaching to a Deck: A pergola can be attached to a deck, but the posts must be mounted to the deck’s beams, the sturdy supports. This provides a good anchoring point, especially in high winds.
- Attaching to a House: Check with your city and/or your homeowner’s association for any permits you’ll need if you’re going to attach it to your house.
- Speed to Completion: A typical pergola can go up in a weekend. However, don’t rush anything. Unless you are a professional, expect your project to take 3 to 4 days depending on your design.
How to Build a Pergola
There are quite a few steps between starting the project and finishing it. This is why many people leave it up to the professionals. If you intend to build it yourself, here are the basics:
Tools
Building a pergola is, at the very least, a two-man job. It also takes more than a few tools. Here are the tools you’ll need:
- Measuring tape
- Hammer
- Drill
- Carpenter’s square
- Shovel
- 3’ level
- Post hole digger or power auger
- Shovel
- Reciprocating saw
- Circular saw
- Saber saw
- Wheelbarrow
Materials
If you buy a kit, much of this should already be included. Check the parts list to see if you have to buy any of it yourself before starting.
- The boards for the pergola
- Construction adhesive
- All mounting hardware (screws, brackets, etc.)
- Concrete
- Power screw tips
- Stain
Before You Buy Anything
- Choose your site. If it’s near your house, remember the overhangs will extend about 18 to 20 inches. Make sure the ground is level, tamping it manually if you have to level it.
- Call before you dig! Have your utility company come out to make sure there are no lines or other such hazards running beneath your site.
- Check to see if you need permits for any part of your design, such as gas or electricity.
- Check how deep you’ll need to make your post holes. Generally, they’ll need to be ¼ the depth of your intended height. For example, an 8-foot tall pergola needs a 2-foot hole and a 10-foot post. A deeper frost line may affect this.
Time to Work!
Ready to start your Pergola?
Find ProsReturn to Top
Hiring a Pro – Questions to Ask Your Contractor
It pays to know what’s going on to help keep from being taken advantage of. Staying informed lets you monitor the work better and lets you ask more intelligent questions when getting quotes.
- How long should this take? – An experienced builder should have an idea of how long the process should take under normal circumstances.
- How much will it cost? – A typical pergola should cost $3,000.00 to $4,800.00, depending on features, materials, and customization.
- How do you quote? – Find out if the quote is by the job or by the hour. Custom pergolas might be charged by the hour because of the variables involved.
- Who gets any permits? – Some contractors will get the permits on their own, but usually the homeowner needs to get them.
- What kind of material do you use? – The material will determine many things about your pergola including how well it stands up to the weather and how it looks as it ages.
- Weatherproofing? – Find out if staining/painting/sealing is included in the quote. A low quote might not include this step.
- How do you anchor it? – Be sure they know how deep to dig for the posts and that they use the right mounting hardware for beams, rafters, and other supports. Galvanized or stainless steel works best.
- What will the final measurements be? – Remember that the rafters will add about 6 inches to the total height. If you need the interior part to be a specific height, be sure the contractor knows this.
- Custom features? – Electricity, gas, built-in seating, etc., will add to the cost. Discuss this with the contractor before signing anything.
- Can I see examples? – Seeing previous work will tell you a lot about the contractor and the kind of job you can expect.
Check on the work regularly, especially when they’re leveling the posts and top. This can affect the ability of your pergola to withstand high winds and shifting soil. Always talk to the supervisor or whomever is leading the project.
Pergola Add-Ons
Once your pergola is built, you may want to customize it. Many people add seating, but here are some other features you might think about:
- Vines – Train a woody, climbing plant to your pergola for beauty and shade.
- Curtains – Soft, sheer curtains further define your pergola as an outside room and can help keep pesky insects away.
- Covers –Some people install retractable covers to allow them to control the amount of sunlight that gets through.
- Hammocks/Swings – A pergola is the perfect place for relaxing in a hammock slung between the posts or a porch swing suspended from the beams.
Pergola Maintenance and Repairs
Maintaining your pergola is something you can do easily:
- Reseal every two to four years.
- Inspect fasteners to make sure they’re still tight.
- If painted, follow the paint manufacturer’s instructions for cleaning.
- If you use a power washer, use a low setting to avoid damaging the wood.
- Vinyl pergolas only need washing with soap and water.
Some repairs can be DIY though they may look major:
- Chips – Chipped wood can be repaired with exterior grade wood putty. Chipped paint can be sanded and painted over.
- Sagging/rotting beams/rafters – Remove the sagging rafters and one good one. Use the good one as a template to cut the new one. Stain/paint to match and reinstall.
- Leaning – Gently pull the pergola back to level and secure it with ropes and stakes (or else like you did when setting the posts). Dig around the base and attach 2×4 braces around the perimeter, top and bottom.
If the posts need work, it’s best to call a professional. It’s labor-intensive and requires a bit of knowledge, and there’s also the risk of the structure collapsing.
In Conclusion
Pergolas may not provide much shade, but they do provide a relaxing spot to enjoy your backyard. For a warm, Mediterranean look, a pergola has got you covered!
 A Guide to Building an Affordable Kitchen Island
  DIY Guide: Replacing a Washer Pump
  DIY Guide: How To Service Your Furnace
  How to Hide Pesky Carpet Seams
  How to Wire a Light Switch

Are You Familiar With This Topic? Share Your Experience.