August 4, 2021
Reviewed by Bob Tschudi, Home Building and Remodeling Expert.Written by HomeAdvisor.
It is possible to paint a popcorn or textured ceiling. However, you have to approach the process differently than you would a flat one. The steps appear to be identical between the two types, but you have to take certain precautions that you wouldn’t have to when painting a flat ceiling. This guide offers tips and advice for this project, including recommended products, tools and techniques.
On This Page:
- Best Paint & Primer for Popcorn Ceilings
- Tools Needed – Roller vs. Spray
- Tips & Techniques
- Repairs
- Removing Stains
- Preparation & Cleaning
- Avoiding Drips, Splatters, Peeling & Other Common Issues
- Steps to Apply Paint
- Painted Acoustic Ceilings
- Repainting
- FAQs
- Working with a Pro Painter
Best Paint for Popcorn Ceilings
The best products are the same as those for flat ceiling— flat or matte finish latex. If you purchase a high-quality product in these finishes, you will spend less time on the project and get better results. You will also benefit from buying a ceiling-specific variety or one that is already pre-mixed with a primer. Be aware, however, that you will need to thin these products out to get the right consistency. An acrylic or latex product is thick as-is and would weigh on the stipple, causing it to peel. You will need to thin it up to 20 percent by adding water gradually and testing the consistency as you go.
Even though flat finishes are the best choice, there is no harm in choosing a satin or semi-gloss variety. These are great choices if you prefer their reflective qualities. They are also more effective in humid homes because they can block moisture.
A few of the most popular brands for this application are Behr, Valspar, Kilz and Zissner. Glidden also makes good economy-priced varieties. The price for each gallon is in a range from $15 to $50, with the higher qualities in a range of $30-$50.
Valspar and Kilz have color changing varieties. These change from pink or purple to white as they dry, making it easier to see your work and apply an even coat. Zissner carries some of the best mold and mildew-resistant options.
Color
The most common color on these styles is white or a shade of it. White makes a room feel larger, taller and brighter. It also keeps the attention away from the ceiling and adapts well to various light sources throughout the day.
Light grays and yellows also work well because they don’t draw too much attention to flaws in the stipple. On the other hand, bright primary colors would not serve well because they would highlight the “cottage cheese” effect.
Darker shades may enhance some spaces—especially if the room is very tall or bright. A darker color can bring down the height, and warm tones can make a room feel more comfortable.
What’s the Best Primer?
You will want to use an oil-based primer on textured acoustic material, because water can soak into that material, weigh on it and pull it away. Once your oil-based coat is on and dry, you can more safely use a water-based color. If there are heavy stains, use a stain-blocking variety to seal the stains and keep them from bleeding through to your new color.
How Much Paint Do You Need?
Typically, you can count on one gallon to cover 350-400 square feet. However, professionals tend to factor in extra for the texture. Because of the “popcorn,” the surface area is about 15 to 25 percent greater per square foot. Consider, also, that you are likely to need two coats—especially if you don’t use a primer. To simplify the calculations, try our paint calculator.
Note: If you use a sprayer, factor in up to 30-40 percent product loss. This is the amount of product that typically ends up on other surfaces (tarps, tape, plastic and clothing) or stays in parts of the machine.
What is Textured Ceiling Paint?
This is the initial product applied to create texture. It is not a particular type of paint that is used to apply new coats on textured ceilings.
There are a variety of options available, from smoother and more subtle applications to those that create a thick, plastered appearance. Popcorn is one of the options available and the process involves spraying it on.
Ready to start your Ceiling Painting Project?
Find ProsReturn to Top
Easiest Tool for Painting Stucco
Roller
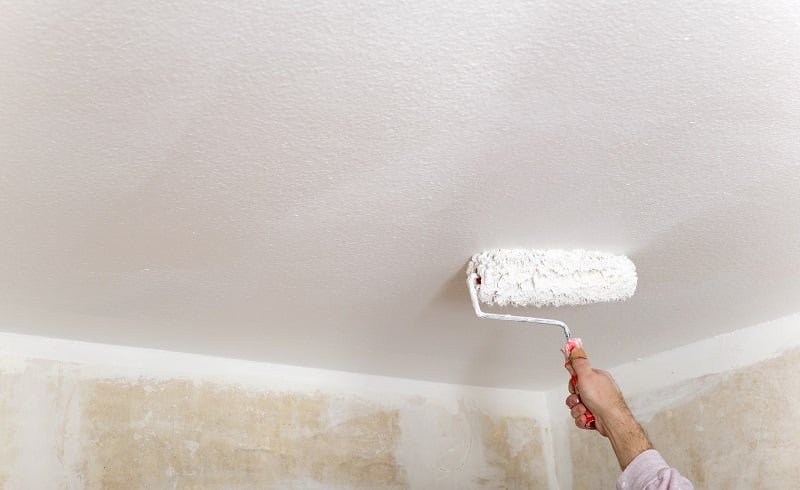
You can use rollers on extended poles. However, this work will be messier than it would be on a flat surface. The stipples will send splatters and drips in unpredictable directions. Because of this, be over-cautious in covering your walls, floors and furniture with tarps or heavy-duty plastic.
You also want to use a thick, high-quality roller cover for this project. Experts recommend using lambswool or specialty synthetic covers with a thickness of ¾ of an inch to 1 ¼ of an inch. For synthetic roller covers, consider buying a segmented style for better application.
With rollers, it is also important to use only light pressure during application and not to over-saturate the area. Heavy product and pressure can loosen it and cause it to break away. A small amount of this is normal and to-be-expected, but you want to aim for as little loss as possible.
Spray Paint
Using an airless sprayer is a highly effective way to get this project done at a good pace. This equipment will give you the best adhesion and optimal delivery. The method inherently calls for two coats, but it will have the best results and coverage.
Professionals recommend the vibrator style to get the best results. They also suggest using a “double spray” method, where you layer one coat in a consistent pattern and direction, then another in the opposite direction after drying.
Set-up and preparation for this method is tedious. You have to get used to the equipment, test it and “mask” the entire room with drop cloths and tarps—sealing up edges with wide masking tape to ensure total coverage. Also, be sure to temporarily remove or cover (with plastic) all smoke and carbon monoxide detectors. If you only need the equipment for this one task, there are many hardware stores that rent them out at around $60-$100 per day and $180-$300 per week.
Brush
You can use a brush for painting along the edges or in hard-to-get spots, but pros do not recommend it as a tool for covering the entire area. This edgework is known as “cutting in” and, for most of these projects, it’s best to cut in 2-3 inches. Be sure not to put too much pressure on your brush or over-saturate the stipple. Ask your paint store professionals for the best brushes for cutting in, as some brushes will put paint on the walls, which will then need touch-ups.
Other Tools & Materials Needed
- Extension Cord
- Step Ladder
- 5-gallon bucket with screen for roller, rather than a tray
- Drop cloths
- Tarps or heavy-duty plastic
- Painter’s tape
- Dust mask
- Safety glasses
- Flathead screwdriver
- Vacuum or feather duster
Tips & Techniques
Before you start on this project, there are a few tried-and-true tips that will save you time and prevent potential disasters.
Testing the material’s water solubility, for example, can save you a significant headache. If you aren’t sure whether or not the surface has been previously painted, squirt water in an out-of-the-way area to test the solubility. If the water absorbs and makes the stipple soft, you’ll want to use an oil-based primer and a sprayer to minimize loss and peeling.
Repairs
Repairs can be simple and straightforward, mostly due to the fact that this style hides flaws and your fix doesn’t have to be as “perfect” as it would have to be on a smooth surface. If asbestos is present, however, it is best to use professional services for repairs in order to ensure best practices.
For areas that are smaller than 8 square feet, you can apply aerosol texture directly to the area. This is available in 16 oz. aerosol cans for less than $15. Larger areas call for pneumatic hoppers, which are small hand-held spray guns that can cover a greater area with the best adhesion. These are $25-$75 and the aerosol powder it uses will cost around $20.
If the surface has never been primed or painted, you can remove the damage by wetting the area and scraping the problem away. There is also a premixed patch available for around $5 per quart that works well for repairs.
Covering Stains
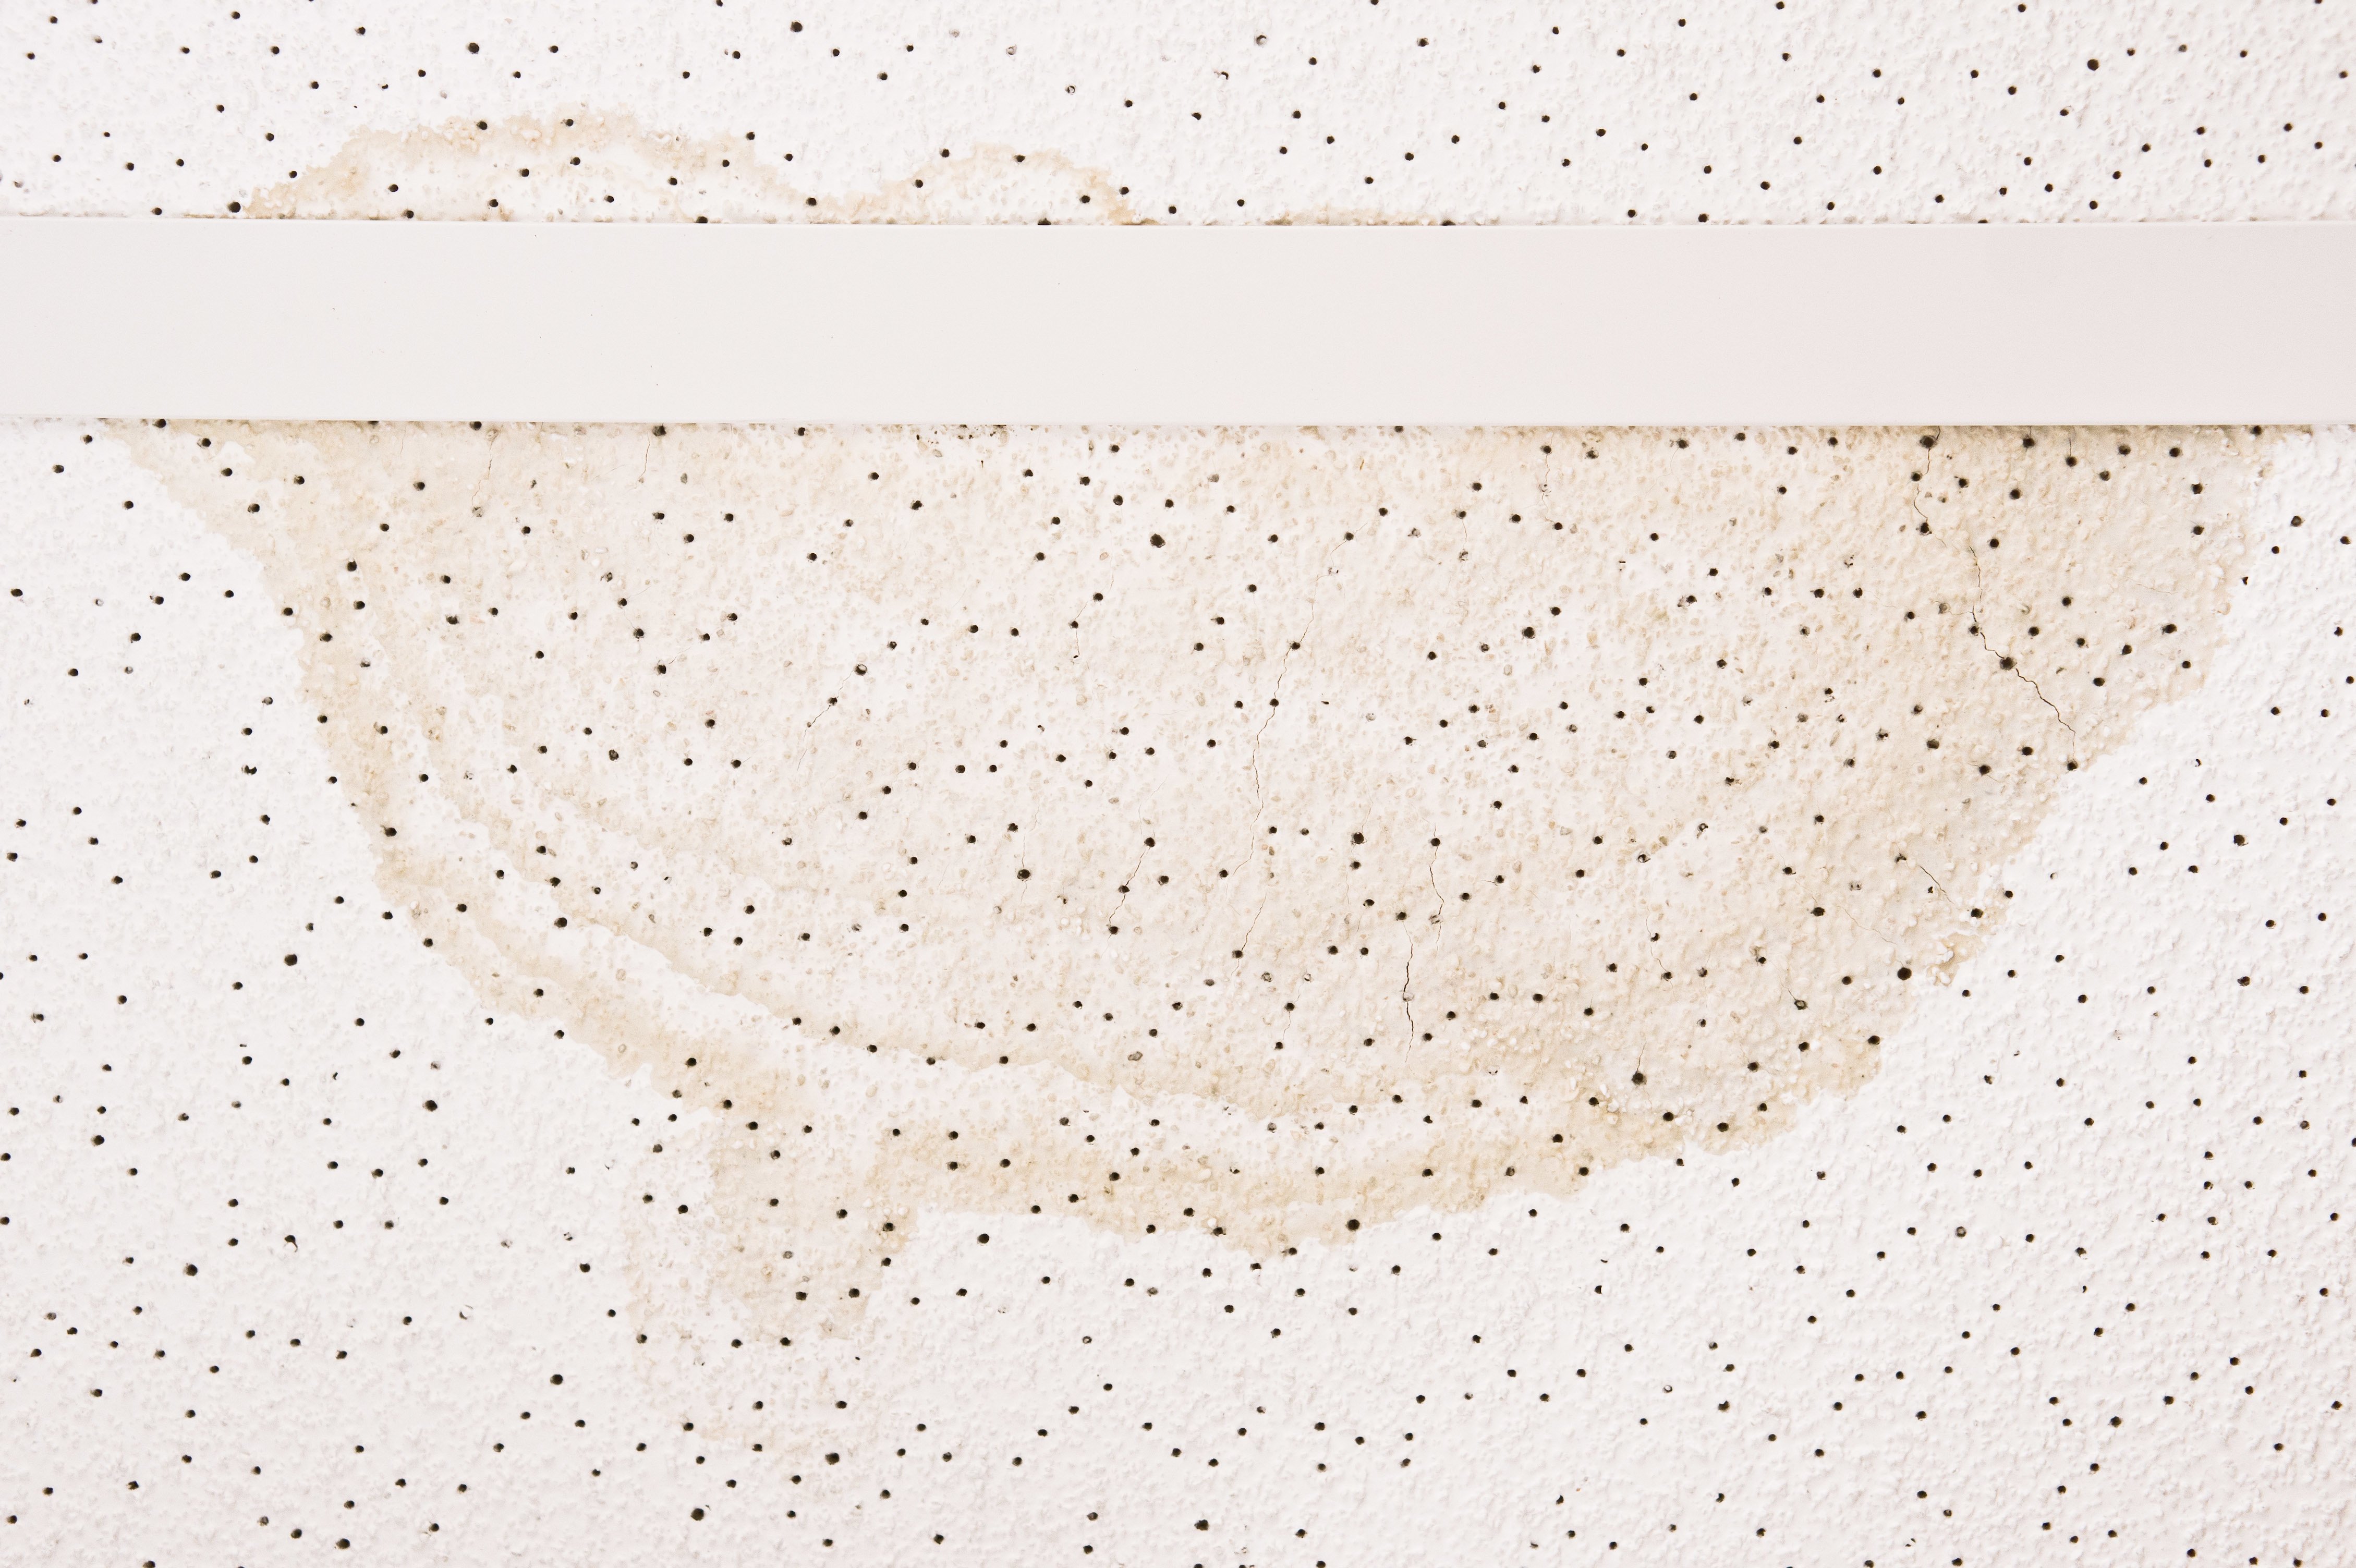
First you must address the cause of the stain. Repairing water damage costs about $4 per square foot. Next, it’s important to prime the area to keep the stain from coming through the top coat. Professionals recommended that you use a stain-blocking oil-based primer for the best results. If you can, apply it with an aerosol can to minimize the pull and saturation of the material. Otherwise, you can roll it on so long as you don’t press too hard. Be sure to let it dry before you proceed.
You also have the option of scraping away the stain entirely, then replacing it with an appropriate patch.
Preparation & Cleaning Before Painting
Dust and debris can collect on this stippled surface. You’ll want to clear that debris away in order to ensure adhesion by using a feather duster or a vacuum with a brush attachment.
If there are stains that you want to clean, the proper cleaning solution will be water and dish or laundry detergent. You’ll want to test the water solubility of the material first. Popcorn does not react well with moisture and you may be better off scraping the stain away and/or patching the spot.
Preventing Common Problems
There are several issues that could come up during this project that you’ll want to prepare for by prepping appropriately and applying correctly.
- Drips and Splatters – These are unavoidable but to minimize this, use a high-quality product; use thick-napped roller covers; and cover everything—including the walls if you don’t plan to coat them. For yourself, you’ll want to wear protective glasses and a dust mask.
- Peeling – Some amount of the popcorn will come off during the process, but you want to keep such loss at a minimum. Peeling happens when you oversaturate the material and put too much pressure on it, or when you use a water-based product directly on an unpainted acoustical texture. To avoid excessive loss, do not run your roller or spray immediately back and forth over the same spot. Use long strokes and lapped edges. Also, when using a roller, apply only gentle pressure.
- Streaks – As much as you don’t want to go back and forth over the same spot, you still want to lap over the edges as you go to prevent streaking. The edges should blend into each other as you work in your pattern or strokes. Keep your roller wet as you work and don’t run it over the surface if it is too dry.
Ready to start your Ceiling Painting Project?
Find ProsReturn to Top
Steps to Apply Paint
- If you are priming, gently cut in from the edges and around fixtures with it.
- From here, apply your primer.
- Roller: Do not use the “W” method on this style. Rolling in straight, long one-directional lines that overlap at the edges is ideal. Start from a corner and work in small sections. Do not go back over a wet area immediately (back and forth). Your nozzle should be about one foot from the area you are covering.
- Sprayer: Establish a pattern and stay consistent.
- Allow to dry fully. It will take longer to dry than in flat applications, averaging 3-4 hours for rolling and 1-2 hours for spraying.
- Repeat the above process with your color.
- Allow to dry.
- For spray, coat again in the opposite direction, perpendicular. Do the same for rolling if necessary.
- Let dry before determining if you need another coat. If it was unpainted to begin with, you will likely need more.
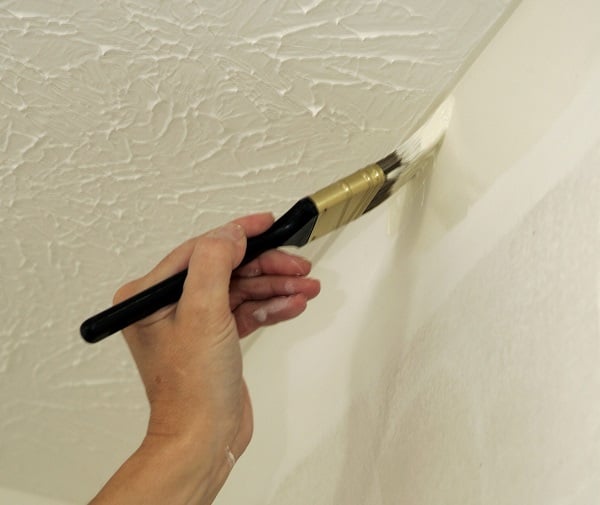
”Cut In” to Get Clean Edges
These edges can be tricky. One trick that people use is to “cut in” using the following tools and direction.
- Take a flathead screwdriver and chip away the stipple closest to the walls.
- Apply your painter’s tape right up along the edge.
- “Cut in” or use a brush to paint about 2-3 inches along the perimeter of the edge.
An angled brush will work well for this application. You can also buy special edgers in roller form, for this project. The roller edgers will be best for getting into the stipple, as opposed to flat ones.
Ready to start your Ceiling Painting Project?
Find ProsReturn to Top
Painted Acoustic Ceilings
Not all acoustic ceilings are the textured styles mentioned in this guide. Acoustic ceilings are available in various styles, all of which are designed to absorb sound. Aside from the popcorn version, there are also drop and glued styles. In a drop style, tiles are suspended in a grid. In the glue style, the tiles are glued.
Best Process for Repainting Stipple
If you are dealing with a previously painted surface, you may not need as many coats and you may not need to prime. This all depends on the condition of the texture, whether it has stains, and what color it is.
If you are making a darker ceiling light, covering water or nicotine stains, you will need to use a primer. If you are applying white on light colors, you might be able to skip priming. Be sure to test the material for water solubility before pouring a water-based can into the tray.
FAQs
How Many Coats of Paint is Required?
Most applications call for two coats. However, if you are applying an identical color and you use a 2-in-1 formula, you may only need one. When using a sprayer, you will almost always need two coats due to the double spray method.
How Do You Remove Mistakes?
If a splatter gets on your walls and you need to remove it, act quickly and wipe it away with a wet rag. You may need to use a mix of water and a gentle detergent. If the drops get on furniture or flooring, you can carefully peel them off with a razor or, for materials that can withstand it, you can use paint remover. To smooth out a bump from a drip, you can use gentle sandpaper.
Can a Popcorn Ceiling with Asbestos be Painted?
Before 1978, the texturing agent for this material contained asbestos. Only professionals with training in handling this toxic element should handle such conditions. Having asbestos professionally removed costs an average of $2,000, but it is often worth it to get the toxin out of your home. You can also cover it with drywall or planks but leaving the hazardous material there may negatively affect the value of your home.
DIY vs. Hiring a Painter – Costs & Considerations
This is a challenging and time-consuming DIY project. However, many homeowners have found themselves capable. Airless equipment kits cost $75-$250 and rentals are $60-$100 per day. Materials alone could cost $70-$200. Hiring a professional cost $225-$550 for the same work. Experts will know how to handle this texture and how best to preserve it throughout the process. They will have the right equipment and know how best to use it.
Ready to start your Ceiling Painting Project?
Find ProsReturn to Top
 How to Paint a Ceiling – Tips & Best Practices
  How to Repair Your Window Unit Air Conditioner
  Painting or Wallpapering Your Interior Walls
  How to Find and Hire a Maid Service: Questions to Ask, Tips and More
  Spring Cleaning Checklist

Does zinzzer mold killing primer work good on popcorn ceilings