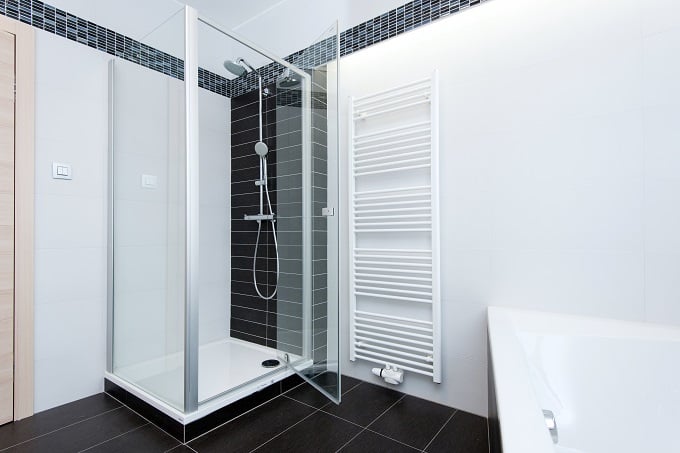
Modern bathrooms often have an open, bright, and spa like feel. Contemporary bath fixtures, beautiful hand-laid tile, and seamless transitions from each element, are essential to creating your bathroom haven. Frameless glass shower doors and enclosures offer affordability and allow for fluidity and a sense of openness in an otherwise small space. Here’s how to tackle the installation of a frameless glass shower door to create the spa-like sanctuary you’re searching for.
On This Page:
- Fixed Shower Panel Installation
- Installing a Door with Hinges
- Sliding Glass Frameless and Semi-Frameless
- Neo-Angle Shower
- Installing on Tile
- Replacing Framed with Frameless
- Additional Considerations
Important note: Always be sure that your glass panels never touch a hard surface. Broken glass can cause injury and hard surfaces may cause chips or scratches that can interfere with the overall aesthetic of your frameless door. You can place a towel on the floor to rest the glass on to prevent damage-causing sharp edges. Never perform the installation on your own.
How to Install a Fixed Shower Panel
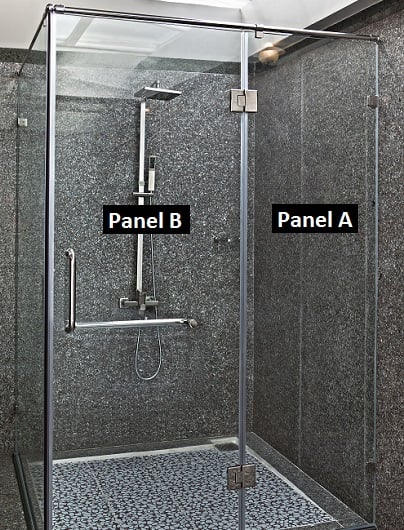
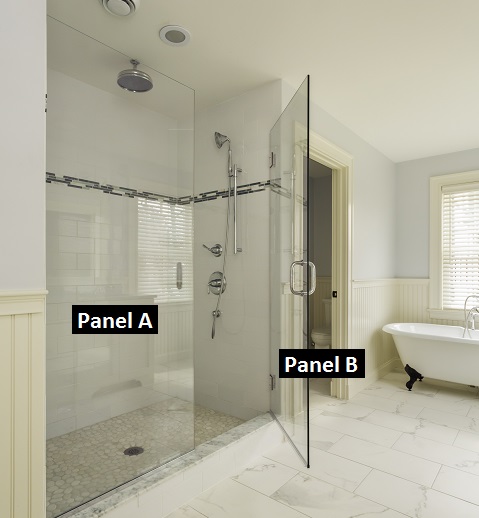
Frameless shower enclosures often have a fixed panel (Panel A) as well as a rotating hinged panel (Panel B). The fixed panel does not move and is often mounted with one or more brackets.
- Time: 1-2 hours
- Cost: $550 to $1300
- Tools:
- A second person
- Level
- Drill and masonry bit
- Wood shims
- Plastic wall anchors
- Silicone caulking
- Pencil
- Make sure the door fits in the space you have and clean the floor and walls where the enclosure will be installed with a mild cleaning spray.
- Stand the immobile panel (Panel A) where you will be installing it. Lift the panel slightly and place one metal bracket on the floor below the panel four inches from the wall. Repeat with a second bracket four inches from the opposite bottom corner.
- Mark the bracket holes with a pencil, then remove the panel. Drill where you marked the holes, insert anchors and screw in the brackets. You can remove the heads of the anchors with a razor blade if they do not lay flush.
- Place Panel A into the floor brackets, then slide two metal brackets between the wall and the panel.
- With your assistant’s help, adjust the glass panel until it is level. Be sure to level the face and outer edge of the glass. Remember: Walls are not always perpendicular and are often not level. The brackets will make up for the difference between the wall and the panel.
- Ensuring the panel is still level, slide one metal bracket four inches from the top of the panel, and the other metal bracket four inches from the floor.
- Mark the bracket holes with a pencil then remove the panel. Drill where you marked the holes, insert anchors and screw in the brackets. You can remove the heads of the anchors with a razor blade if they do not lay flush.
- Once the brackets are screwed in, you can now place the panel in the brackets. Ensure that the panel is level on the outer edge. To do this, place your level on the exposed vertical edge of the panel, this is where the door (Panel B) will line up with Panel A.
- Within the brackets are tightening screws that secure the panel in place. Tighten these brackets until they are firm. Do not over tighten them because this risks damaging the glass.
- Use clear silicone along the floor and wall of Panel A to create a watertight seal. Allow silicone to dry for 24 hours before use.
Ready to start your Shower Door Installation?
Find ProsReturn To Top
How to Install a Frameless Door with Hinges
The most common form of frameless glass shower enclosures is a door with hinges. These enclosures often have a fixed panel (Panel A), which was installed in the directions above, as well as a rotating, hinged panel (Panel B). Hinges are classified in two categories: regular and pivot. A regular hinge operates much like a door in your home where it opens 90 degrees in a single direction. A pivot hinge is a door that can be pushed or pulled open with a range of 180 degrees. The steps for installing either hinge style are very similar.
- Tools:
- A second person
- Level
- Drill and Masonry Bit
- Wood shims
- Plastic wall anchors
- Silicone Caulking
- Pencil
- Make sure the door fits in the available space and clean the floor and walls where the enclosure will be installed with a mild cleaning spray.
- Secure handle and hinges on the panel with the holes and cut outs. Be sure not to overtighten the brackets to avoid damaging the glass.
- Place wood shims on the floor and stand Panel B where you will be installing it. Panel B is a swinging door and is shorter than Panel A due to a water sweep that helps keep your bathroom floor dry. A water sweep is a clear plastic strip that clips on the bottom edge of the swinging door. This closes the gap between the swinging door (Panel B) and the floor.
- Align Panel B in accordance to Panel A by ensuring a minimal 1/16th inch gap between the panels from top to bottom. Ensure the top of the two panels are level with each other.
- Mark hinge holes with a pencil then remove the panel. Drill where you marked the holes. Insert anchors. You can remove the heads of the anchors with a razor blade if they are not flush.
- Place Panel B back on the wood shims. Double check that the holes are lined up and that you maintain the 1/16th inch gap. Screw the hinges to the wall.
- Add water sweep to the bottom of the hinged door.
Ready to start your Shower Door Installation?
Find ProsReturn To Top
Installing Sliding Glass Frameless and Semi-Frameless Screens
Screens
A shower screen is a single glass barrier that prevents water from splashing onto the floor without fully enclosing the shower. This type of partition can be frameless or semi frameless. A semi frameless screen has a metal conduit along the wall and floor. This conduit allows for an easier installation but does not have the same, seamless effect as a frameless screen.

Bypass
Another option for a frameless glass shower enclosure is the bypass alternative. This door functions much like a sliding patio or closet door. There is often a track where the panel slides back and forth with one or no fixed panels. These doors often come with rollers to assist in moving the heavy glass panels.
- Tools:
- A second person
- Level
- Drill and Masonry Bit
- Wood shims
- Plastic wall anchors
- Pencil
- Make sure the door fits in your shower space. Clean the floor and walls where the enclosure will be installed with a mild cleaning spray.
- Follow steps on How to Install a Fixed Shower Panel
- Install the bypass bar. This bar is a guide track for the sliding door. It looks much like a shower curtain rod, but is secured into the wall. Hold the bar up to the shower wall lined up to the support holes on the top of Panel A.
- Mark the holes located in the glass panel onto the bar with a permanent marker. Install the support hardware on the bar matching the holes. Tighten the supports so they do not move.
- Place endcaps over the supports. Ensure the bar is level, adjust if necessary.
- Mark around the ends of the bar, then remove the bar supports from Panel A.
- Drill a hole in the center of the circular marking you made in the previous step. Insert an anchor and secure the endcap to the wall with a drill and screw.
- Place Panel B inside the shower against the back wall. Reinstall the bar onto Panel A and slide the bar into the supports and secure the bar in the endcaps. Tighten the screws on the endcaps to secure the pole.
- Secure handle and top rollers on Panel B with the holes and cut outs. Be sure to avoid overtightening so that you don’t damage the glass.
- Place floor guide on the floor and screw it directly into the floor. The floor guide is a metal divider between the fixed and sliding panel that prevents the bottom of the door from swinging and hitting the other panel.
- Place wood shims on the floor and hang Panel B. Place bottom roller in the remaining holes on the door. Ensure that the wheels rotate easily.
Important note: It is important to properly maintain the metal tracks in a wet bathroom environment. Bypass or sliding doors on tracks can rust or cause other issues that could require costly repairs. Consult a professional when choosing the best type of shower door for your bathroom. Hiring a contractor for proper installation is recommended for bypass and sliding door installation.
Ready to start your Shower Door Installation?
Find ProsReturn To Top
Neo-Angle Shower Door Installation
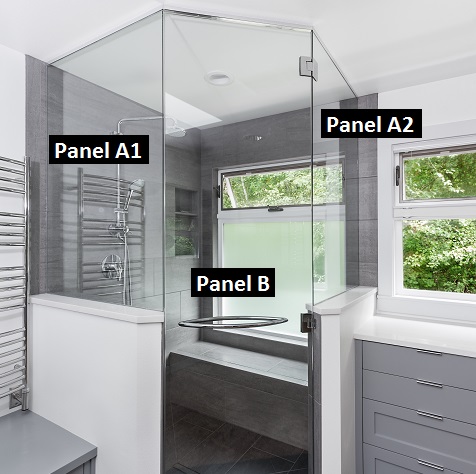
A Neo-Angle Shower is an efficient space saving option for smaller bathrooms where the use of space needs to be strategically planned. This shower is created cutting across a corner. This design has three panels. Two panels much like Panel A as described above and a single Panel B. Panel A1 and Panel A2 run perpendicular to the corner walls and Panel B closes that space. To accomplish this, you install the panels in the same way as the standard frameless with the exception of corner brackets that secure the three panels together, creating a stable structure.
Installing on Tile
Installing on tile requires a masonry drill bit that can be found at any hardware store. This bit is specially designed to drill into tile without cracking or damaging it. Prefabricated walls can be drilled into as well, just be sure to drill carefully to avoid damage.
Replacing a Framed Shower with Frameless
Removal of a framed door requires some patience and the assistance of another person to ensure safety.
- Tools:
- A second person
- Drill
- Tile or Prefab appropriate caulking
- Box cutter
- Slide your box cutter across any silicone along the walls and floor to separate the glass. Be sure to avoid touching the wall with the blade which could scrape or damage prefab plastic or tile.
- Remove screws from the metal framing one panel at a time, ensuring that your assistant supports the panel as it comes down.
- Remove each panel in the same manner. You may need to use the box cutter to continually remove excess silicone along the wall.
- Once the panels have been removed, peel the remaining silicone off the walls and floor.
- Fill any holes with caulk. You are now ready to install your new frameless door.
Ready to start your Shower Door Installation?
Find ProsReturn To Top
Other Considerations
Installing a new frameless door or screen takes a bit of planning and research. Make sure you measure your shower multiple times before purchasing the glass panels to ensure a proper fit. Always double check that everything is level before drilling holes.
Glass Weight
Glass shower doors can range from 80 to 100 pounds so it is essential to use sturdy hardware and an assistant when installing. Always be sure to use wall anchors when installing the heavy glass to prevent wall damage.
Need a Pro?
Always call a pro if you are unsure about any part of the installation process. DIY mistakes may lead to injury if the glass is broken or if the anchors are improperly installed.
Check out our Shower Door Cost Guide to learn how much it will cost to hire a professional for this project.
 How to Install or Replace Shower Doors
  How to Repair Chips & Cracks in Your Bathtub or Shower Pan
  How to Replace or Install a Bathroom Fan
  How To Clean Shower Doors
  Bathroom Cabinets

Are You Familiar With This Topic? Share Your Experience.