Without much thought, we depend on our roofs. Finding a leak can be alarming, but it may be an easy, inexpensive fix. If you’ve noticed sagging drywall, a spreading water stain or an active drip, your roof has probably sprung a leak. Don’t ignore it. Leaks can slowly damage the interior of a home. Over time, water causes wood to rot, destroys drywall and encourages mold growth. You can always hire a professional to find and repair the leak which costs most homeowners an average of $750 nationally.
This guide walks you through how to find and repair leaks in shingled roofs. Though we won’t cover flat, metal or membrane styles – the discovery techniques used here can be useful for other types of sloped roofs.
On this Page
- Finding Small or Large Roof Leaks
- Temporary Fixes for Emergency Leaks
- Replacing or Fixing Shingles
- Using Sealants as the Solution
- FAQs
- DIY vs. Hiring a Pro
Finding a Roof Leak
This section is a step-by-step guide to find the source. Some methods require two people plus roof and attic access. Contact a professional if you’re unable to execute any of these steps safely.
Locating the exact leak location isn’t always as straightforward as it may sound, especially with pitched roofs. Leaks tend to be higher up from the obvious interior leak. Water gets under the shingles and then travels down the rafters or sheathing before finally finding a nail or protrusion to aim that stream of water at your ceiling. Once there, it may pool and cause sagging or bubbling, or it may travel farther, finding light fixtures or other openings to drain through.
Below are the tools you’ll need to help you discover the source of the problem.
- A Helper
- Ladder
- Garden Hose (if it’s not raining)
- Dust Mask
- Flashlight
- Tape Measure
How to Find the Leak
- Have one person enter the attic. Use a dust mask. Locate the area where water is leaking through your ceiling. If you have exposed fiberglass insulation, move it aside
Tip: Wear long sleeves, a dust mask and gloves when working with fiberglass insulation to prevent itching and irritation. - Scan for water damage. Look above the ceiling leak point and scan the sheathing leading towards the peak of the roof. It may not be a direct line, but it will always be above the ceiling leak location.
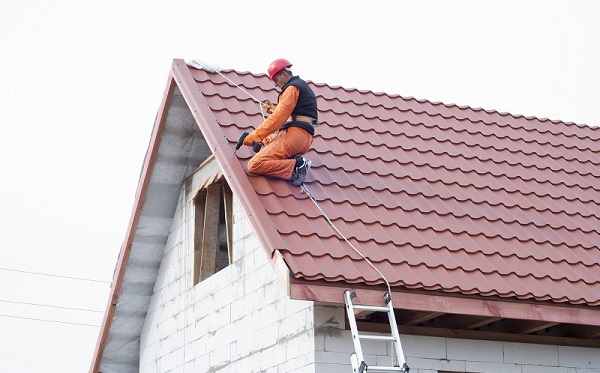
- Run water on the outside with a hose. Have one person climb on the roof and spray water above the suspected leak location. You may need to do this for a few minutes before you find it.
- Mark the leak location. You can mark the leak location from within the attic or simply measure the distance from the highest point to the water damage. Then, have the other person measure from the ridgeline of the roof down the same distance. This is the source of your leak.
Tip: You’ll be walking on a wet, slippery roof, use a proper safety harness attached securely to your roof.
Common Causes
Weather, such as high winds and hail, can damage your shingles either directly or by knocking dead and dying branches from overhanging trees. Shingles don’t last forever. They usually come with a warrantied period of 15 to 50 years. As they age, they are more prone to damage from weather.
Misdiagnosing leads to further damage. If the cause isn’t apparent, contact a professional. Depending on the cause of the damage, insurance will often cover replacement. Insurance companies typically require a licensed professional.
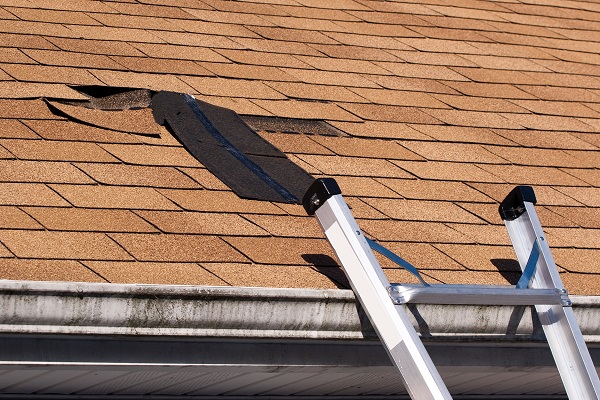
- Missing Shingles– Shingles come with a wind rating. The type on your home usually exceeds local weather requirements. Even so, wind can rip a shingle off, creating a perfect path for water to enter your home.
- Cracked or Damaged Shingles – Overhanging branches or hail can break the material, regardless of type. Keep trees trimmed and purchase ones with a high hail rating.
- Gaps – With age, wood swelling and settling, gaps can form around flashing.
- Broken or Worn Flashing – When flashing fails, replace it along with any adhesives and sealants.
Roof Inspections
Whatever the age of your roof or the cause of a leak, you should get an inspection. A leak may indicate other unnoticed or underlying issues such as improper installation or structural issues. These can lead to further leaks and costly damage. A roof inspection runs about $200, over $500 less than a repair.
Ready to start your Roof Repair?
Find ProsReturn to Top
Temporary Fixes for Emergency Leaks
Sometimes, you just need a quick fix to keep the problem from getting worse while you wait for help to arrive. A tree limb snaps and impales your new roof, lightning strikes or a rogue hailstone punches through a weak spot. Whatever the cause, you have a hole with rain pouring in. For large holes, use a tarp or plastic sheeting with a couple two by fours.
Note: Since shingle types and causes vary, so will the fixes. In almost all cases, you’ll want to fix damaged or missing shingles mechanically. Temporary fixes like sealants and tarps are always a short-term solution but may be necessary for emergency or budgetary reasons.
Tools & Materials Needed
- Ladder
- Safety Harness and Rope
- Hammer
- Roofing Sealant
- Trowel
- 16+ feet of 2×4’s
- Plywood Sheet
Emergency Tarp Fix
Use a tarp to cover the hole without causing further damage. Securely attach your safety harness before beginning.
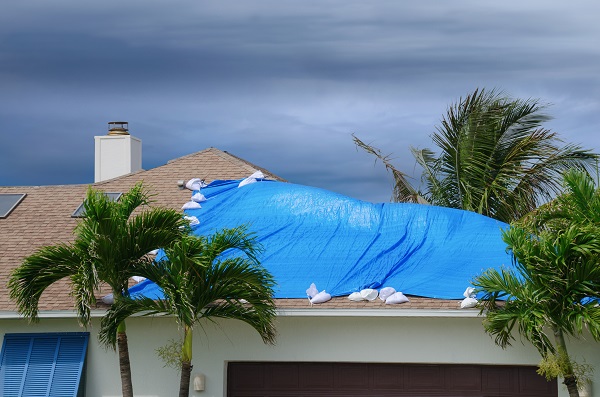
- Cut the tarp or plastic sheeting to fit over the hole or leaking spot. 2. Attach one end of the tarp to the length of a two by four board.
- Stretch the tarp over the hole, preferably over the ridgeline.
- Attach the opposite side of the sheet to the other two by four.
Note: during high winds, you can attach the tarp directly by sandwiching the tarp between a piece of wood and the roof and screwing the boards to the roof. However, this causes more damage that may need repairs later.
Sealant or Cement Fix
Use spray-on silicone or wet-applied sealant for a quick fix on the roof or inside the attic during a storm. Keep in mind that this fix is for emergency purposes only. Sealing asphalt or wood shingles may void your warranty. When the weather clears, immediately have a professional inspect, repair or replace, or follow the steps listed below in the “replacing or fixing asphalt shingles” section.
Note: Interior attic sealant applications only divert the water to another area. Left alone, it will end up rotting the wood sheathing. Locate the leak using the above steps.
- On the Rooftop: Apply the sealant or cement to the area surrounding the leak. Apply sealants beneath the shingle tabs or directly on the shingle – follow the directions of the sealant you’ve chosen. Apply it at least three shingle rows above the leak location. If shingles are damaged or missing, completely cover the damaged area, overlapping generously with the surrounding shingles.
- In the Attic: Find the leak location and spray a couple of coats of silicone sealant on the surrounding area.
Temporarily Patching a Hole
High winds can easily rip a branch from its tree and plant it squarely in your roof. If possible, correctly fix it by cutting out and replacing the sheathing and all shingles as described in the next section as soon as possible.
- Cut a piece of plywood slightly larger than the hole.
- Apply liberal amounts of roofing mastic or cement around the hole.
- Place the board over the hole and either screw or nail down the board.
- Apply liberal amounts of mastic or cement around the edges of the plywood board to seal the gap between it and the shingles.
Ready to start your Roof Repair?
Find ProsReturn to Top
Replacing or Fixing Shingles
The only long-term solution for leaks is replacing the shingles and underlayment. If there is damage to the roofs sheathing, it needs to be repaired or replaced. This guide doesn’t cover structural repairs. If you find damage, calling a licensed professional is your safest bet.
Tools Needed
- Ladder
- Safety Harness and Rope
- Hammer
- Flat Bar
- Utility Knife
- Tar Paper
- Extra Matching Shingles
- Roofing Nails
Asphalt Shingles
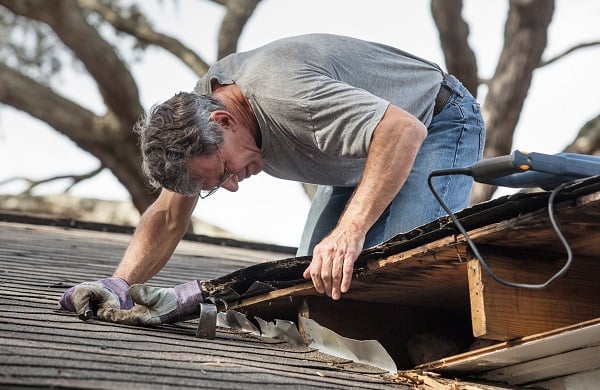
- Loosen the shingles. Gently slide the flat bar under the shingles until you find the roofing nails. Gently pry the nails out of the sheathing two to three rows above the location of the leak and as wide as necessary. Do not tear any shingles. The nails on one shingle go through the shingle below it. Because of this, you’ll need to loosen two rows above the topmost row you are going to remove.
- Gently remove the shingles starting with the lowest and working your way up. Remove these so as not to damage the surrounding shingles.
- Remove damaged tar paper or any underlayment. Not all have this; if yours doesn’t, there is no need to install any.
- Check for damaged sheathing. For small holes, use flashing under the felt or tar paper. For rot, water damage or large holes, replace the sheathing. Cut out around the rot or damage and install new sheathing. Use 2×4’s to reinforce rafters to local code requirements. If necessary, call a professional.
- Lay new tar paper, felt or Ice and Water Guard. Start at the bottom of the cleared area rolling it out horizontally. Overlap each layer above it just like you would the shingles. For the topmost layer, slide the top edge under the top edge of the existing layer above it.
- Replace the shingles. Start at the bottom row and work your way up. Align the shingles perfectly to the existing bottom row, tabs on the lower side. Use four nails in a straight line – one inch above the cutout and one inch in from the sides. Do not nail through the exposed tabs.
- Finish the top row. Carefully lift the top existing row tabs and nail down the top row. Do the same for the second row above it.
Wood Shake Shingle
This material requires a slightly different method. You’ll need a wood chisel in addition to the above tools.
- Split damaged or rotten shingles. Split them along the grain or remove the entire shingle.
- Remove nails. Slide the flat bar under the upper row and remove any nails.
- Prepare a replacement shingle. Measure the space and cut a shingle one-half inch narrower than the available space. This allows one-quarter inch on either side for the new shingle to expand with humidity.
- Slide the shingles in place. Leave about one-half to three-quarters of an inch before its flush with the row.
- Attach with roofing nails. Use two or three roofing nails angled upward at the butt of the shingle above it.
- Tap it in flush. Use a wood block or hammer to move it the last half inch into place. It should end flush with the row. As you tap the shingle into place, it will straighten and hide the angled nails.
Using Sealants as the Solution
If the leak is due to faulty or missing flashing, sealants might be the cure. Use sealants on all flashing around skylights and protrusions like a chimney or vent. You should never use them to fix shingles permanently. It may work as a stop-gap measure to fix broken or cracked shingles until you have time to replace them.
For a quick, short-term shingle fix, all you’ll need is some mastic or roofing cement, a trowel and a flat bar:
- Lift the broken shingle up with the flat bar. You may need to pry the nail out a bit. If you do, don’t forget to hammer it back in at the end.
- Spread the sealant. Using the trowel, spread the sealant under the broken shingle.
- Flatten the shingle out gently. The sealant should seal the cutout – the gap between the tabs – on a three-tab shingle.
You should never completely coat or seal asphalt, wood or shake shingles. If your roof has flat areas, you may want to consider a new roof coating which costs an average of $800 for professional installation.
FAQs
What to Do When your Roof Leaks?
If you can, call a professional 24-hour emergency roof repair service. Otherwise, use the steps above to find and temporarily patch or repair the area.
Why is my Brand-New Roof Leaking?
Improper installation is likely the cause of your roof leak. If your roof is new and you used a licensed professional, it’s probably under warranty. Immediately contact the professional to have the roof fixed. Also contact your insurance company. Take plenty of photos and video.
What are the Signs that I Have a Roof Problem?
Look for:
- Water Dripping from Ceiling Fixtures
- Sagging or Blistering Drywall
- Water Stains
- Attic or Ceiling Mold – this may also be a sign of poor attic ventilation.
- Soft Roof – when you walk on the roof, there should be no “soft” spots where your foot sinks into the shingles.
How to Fix Flashing?
Use flashing around roof protrusions like chimney’s and vents, valleys, dormers and windows. Fixing sometimes requires adding new flashing, roofing mastic or cement, and can often be a DIY job – depending on its location.
What about Dormers, Vents, and Valleys?
These areas usually need more sealants, roof cement and flashing. This all means more opportunity for water to find a way in. Dormers protrude from a sloped roof, usually to accommodate windows. There are two types of roof vents, plumbing vents – the small pipes you see on your roof – and attic venting. Valleys are the lines where two roof slopes meet.
Can I Repair my Roof from the Inside Ceiling or Attic?
The short answer: don’t do it except for emergencies with the methods listed above. Fixing a leak from inside the home is impossible – it only diverts water to another part of the roof where it will eventually find its way in or cause sheathing rot and further damage. Once water finds its way under your shingles and any underlayment, replace the shingles. If you can’t get on your roof and replace damaged shingles, call a professional contractor.
Can I Fix the Issue Myself with a DIY Kit?
There are no DIY kits for shingles, only flat roofs. You should not use a flat roof kit for a shingled roof.
Ready to start your Roof Repair?
Find ProsReturn to Top
DIY vs. Hiring a Pro
If you already have the tools, it’ll only cost you $16-$25 for some three-tab or architectural 25-year shingles and
 Rubber Roofing – Benefits & Alternatives
  Should You Layer Shingles on Your Roof?
  Built Up Roof Basics
  Roofing Shingles Come in All Shapes and Sizes
  Increase Your Home’s Value with a New Roof

Are You Familiar With This Topic? Share Your Experience.