Removable, handheld shower heads will increase your shower’s comfort and efficiency. This quick guide will help you install a new head, whether it’s part of a quick replacement or a total bathroom overhaul. It’s important to note that this installation information is only for handheld heads. Using this guide for rain or fixed shower heads can lead to leaks and other problems.
On This Page:
- Installing New Head
- Instructions to Replace Fixed with Detachable Head
- Best Way to Clean a Shower Head
- Hiring a Pro
Installing a New Handheld Shower Head
Here’s a look at a variety of factors that will affect how you install your new handheld shower head.
Tools Needed
- Handheld shower head kit
- Teflon tape
- Wrench
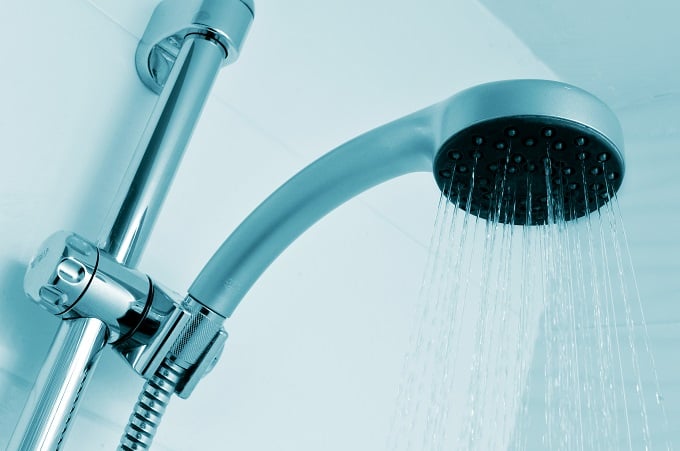
Detachable Head Parts
Here’s a quick breakdown of the main components.
- Shower wand: The detachable head.
- Metal hose: The hose that connects your wand to your home’s plumbing.
- Sidebar and clamp: The bar attached to your wall that allows your showerhead to slide up and down. (Sidebars and clamps aren’t included in all models.)
- Mounting bracket. The bracket that screws onto the arm and connects your wand, hose and water supply.
- Wall bracket: The stationary clamp near your arm is used to hold the wand in place. Wall brackets are not universal.
Installing a Shower Head with a Hose
Here’s how to install your new head in an existing shower:
- Turn off your water. If your shower doesn’t have a local shut-off, turn off your home’s water
main. This is usually located in your basement toward the front of the house or in your garage. - Add your mounting bracket. If your new shower head has a backing plate, slide that on first. Next, screw on your mounting bracket and tighten by hand. Be sure that the hose connection is on the bottom of the bracket.
- Connect your hose. Screw your hose onto the mounting bracket. Be sure to connect the correct end to the bracket. Most hoses have a decorative cone on the end that screws into the wand.
- Connect your wand. Screw your wand onto the hose. Tighten by hand.
- Check for leaks. Turn on your water and let the water run for several minutes. Look for leaks around the connection areas.
Ready to start your Shower Head Installation?
Find Pros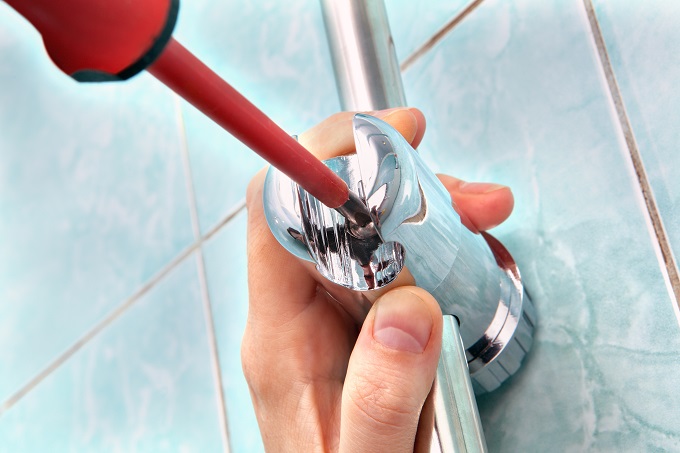
Whole-Shower Arm & Access Hole Installation
If adding the new head is part of a complete shower install, you’ll need to add the plumbing and valves first. Once your shower’s structural and plumbing components are in place, cut an access hole in the wall for your arm and head. Finish your prep by wrapping both ends of your shower arm in Teflon and screwing it into place. Once you’ve installed the arm, use the steps above to affix the head.
Here are a few important considerations when cutting the access hole:
- Height. Unlike fixed heads, handheld models need to be within reach. Be sure to select a location that’s comfortable and easily accessible for both short and tall family members.
- Stall material. The enclosure material is also an important installation factor. If you have a fiberglass, laminate or acrylic stall, use a general-purpose, fine-tooth hole saw to make the cut. For ceramic or porcelain stalls, use a diamond-bladed hole saw. It’s also important to use a starter bit for ceramic and porcelain tile. Starter bits create a centered hole and help you avoid chipping or cracking your tile.
- Arm Hole Size. It important to measure the circumference of the hole correctly. Undersized holes will result in additional drilling. The pressure caused by extra cutting can cause your tile to crack and chip. Additionally, oversized holes can leave a gap between your showerhead’s backing plate and the cut. This can ruin the look of your new hardware. It’s also important to be aware of the hardware behind the wall before you begin cutting. Carelessly cutting an access hole can damage the pipes behind your stall. Make sure your cuts are shallow enough to avoid major plumbing.
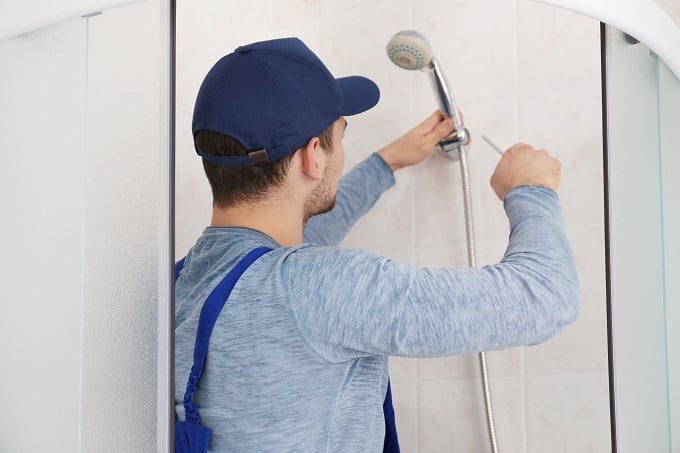
Hire a pro if you’re unsure about cutting your access hole. Mistakes can crack your shower stall and damage the plumbing behind your wall.
How to Replace a Fixed Shower Head with a Handheld Model
Replacing a dated or deteriorating fixed shower head is a great way to improve the looks and usability of your shower. Use this guide to help:
- Turn off your water. If it doesn’t have a local shut-off, turn off your home’s water
main. This is usually located in your basement toward the front of the house or in your garage. - Remove the fixed piece. Use a wrench to turn it counterclockwise. Remove the head and clean the shower arm threads.
- Add your mounting bracket. If your new head has a backing plate, slide that on first. Next, screw on your mounting bracket and tighten by hand. Be sure that the hose connection is on the bottom of the bracket.
- Connect your hose. Screw your hose onto the mounting bracket. Be sure to connect the correct end to the bracket. Most hoses have a decorative cone on the end that screws into the wand.
- Connect your wand. Screw your wand onto the hose. Tighten by hand.
- Check for leaks. Turn on your water and let the faucet run for several minutes. Look for leaks around the connections.
Ready to start your Shower Head Installation?
Find ProsHow To Clean a Shower Head
- Clean the showerhead. Fill a large plastic bag with distilled white vinegar and tie it around your showerhead.
- Let it sit. Allow your showerhead to soak in the vinegar for an hour.
- Remove the bag. Untie the bag and wipe away any buildup with a rag.
Hiring a Pro
While adding or replacing a showerhead can be a simple project, it’s a good idea to hire a pro for related jobs like pipe and valve installations. Mistakes during these projects can cause problems that will ruin your stall. The cost to have your shower head installed by a contractor can range anywhere from $20 to $300 for custom heads. While the work can run on the higher end, it’s recommended that you hire professional help when working with any specially designed pieces.
 How to Repair, Replace and Install Bathtub Faucets and Shower Valves
  Toilet Installation – Learn to DIY or Hire a Pro
  How to Install or Replace a New Shower Head
  Corner Bathroom and Kitchen Sinks
  Customize Your Toilet with a Bidet Faucet

There is no need to hire anyone to teach you how to install and remove the handheld showerhead. You only need to read the guide on this blog, and you are good to go.